
By Michel Colman
Solving a “very easy” kaodoku
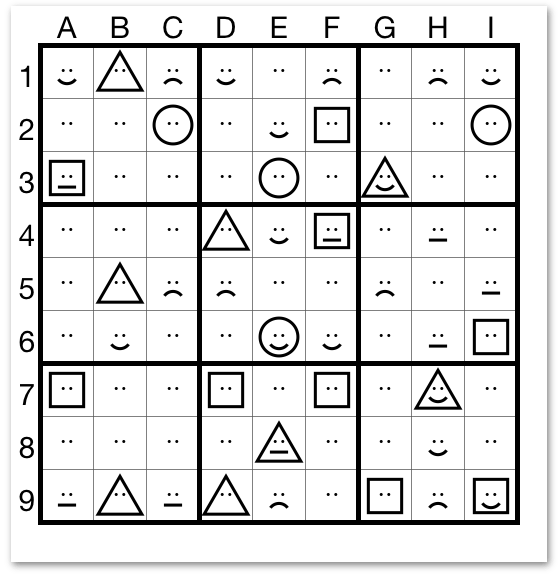
(For a harder example, click here)If you are not used to solving kaodokus, even the very easy ones may seem very hard to solve at first sight. It may take you a while before you even find a single way of making progress. If you use the hints function in the kaodoku app, though, you will be surprised to see how many totally independent ways forward there are. It’s all just a matter of getting used to the symbols, and learning how to look at combinations of mouths or shapes instead of just full symbols. Take this “very easy” kaodoku, for example:
Here are some of the things you could have found at a glance, all independent from each other. You wouldn’t have needed to find all of these to solve the puzzle, this list is just to show you in how many ways you could have gotten started.
- In the top row, there are three happy mouths and three sad mouths. This means the remaining three cells B1, E1 and G1 must contain the missing neutral mouths. You can enter all of these even though you don’t know the shape yet in E1 and G1.
- Another area that has lots of cells partially filled in, is the bottom row, so it’s probably a good idea to look there. Sure enough, the happy circle only fits in F9 because the other cells already have a different mouth or shape.
- Now we’ll look for symbols that only have one possible position in some area. The neutral square, for example, since there are already two of those on the grid. In the left center box, it can only be in C6 thanks to A3 and F4.
- Row 7 already has three squares, only one of which can be the neutral one. D7 it is.
- We’re not done yet with the neutral squares: In row 5 it can only be in I5. H5 cannot be neutral because there are already three neutral mouths in the same box.
- And would you believe it, column B also has just one spot for the neutral square, B8, thanks to the three squares in row 7 eliminating B7.
- And why not, column E. Another neutral square in E1 thanks to F4 and the three squares from row 7 again.
- Now for a different symbol. In column I, the happy triangle must be in I4 thanks to its colleagues in G3 and H7. It’s also the only place for it in the right center box, so you could have found it that way too.
- It’s usually a good idea to look at cells that already have a mouth or a shape, because you can often eliminate two of the three possibilities there. The easiest without a doubt is H8, with the happy triangle and square right next to it.
- I1 is another, with G3 and I9 leaving the happy circle as the only possible symbol there.
- But don’t just use the full symbols: F6, for example, can only be a happy triangle because there are already three squares in its column, and a happy circle to its left.
- And similarly, B6 has to be a happy square.
- Of the three triangles in column B, only B9 can be the sad one because the others both have three sad mouths in their respective rows.
- Now let’s look for some more triplets, mouths in particular. Three sad mouths in the fifth row, three happy mouths in the center box, that means E5 and F5 must be neutral while the two missing sad mouths in the center box can only be in D4 and D6. That’s all the mouths in that box in one fell swoop. Oh, and that neutral mouth in E5 must be a circle thanks to F4 and E8.
- Moving to the right center box, the three neutral mouths mean we just have to fill in happy and sad mouths there. But there are already three happy mouths in the sixth line. So G6 and I6 must be sad while the happy mouths can only be in G4, H5 and I4. Another box filled with mouths.
- More triplets? Three squares in row 7 and three triangles in column B make B7 a circle. The mouth is unknown for now, but a true kaodoku solver does not care and just enters the shape already.
- Some more mouths: in column G, only two possible spots remain for the two missing happy mouths, given the happy triplets in row 1, row 6 and the bottom right box. So G2 and G4 are happy.
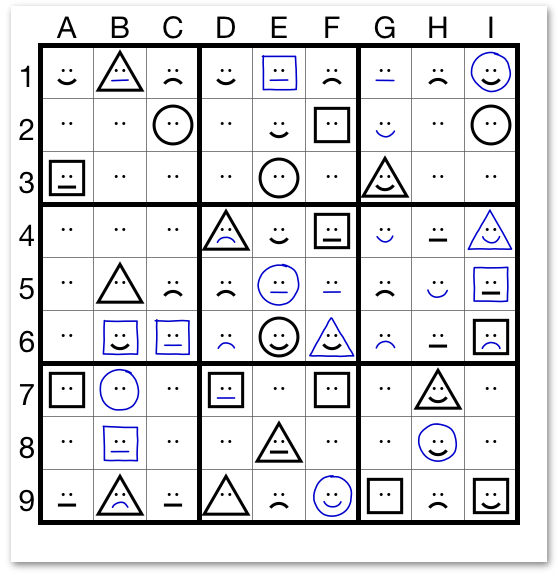
And of course lots of further avenues have opened up now. G1, F5, H5, E4, D9, E7, B5, E3, E9, D7, the mouth in A6, the neutral squares in row 9 and column H, the happy circles in the right center box and fifth row, and so on and so on.